Wednesday, May 26, 2010

Pam’s Life’s a Beach Card

Pam missed our exchange last month, but she sent me a picture of her card.  She gave me permission to post it here and told me where to go to get information on how to make it.  Click on it to enlarge it.  Pam used the reeds from Autumn Days for her beach plants and Summer by the Sea (sadly, retired).  Pam said she colored the kids with an aqua painter and the ink-in-the lid technique.

Beach children step card

Go here for a link to the card Pam CASE’d made by Chris Twing.  Go here for a link to Chris’ blog.  I went there and couldn’t find the card or the instructions (although there’s lots of other great stuff), so I poked around in the resources on Splitcoast for a tutorial. Go here for a link to Beate’s tutorial on how to make the step card.  I thought I had the Summer by the Sea set. But as it appears not, I know a couple places where I can borrow it.  Hint, hint. 

That’s it for now. Comments always welcome.

(-: ¸.·´* .·´*¨¨)) -:¦:- ***
((¸¸.·´*~Kathy.·´*)****¨¨))
-:¦:- ·· ((¸¸.·´* .·´*((¸¸.·.·´ *-:¦:- ... :-)

Tuesday, May 11, 2010

May Creative Images Meeting

A lot of us were out of town this week for various reasons, some for fun, some for sadness.  Our hearts go out to Linda on the loss of her mother.  Of the eight of us there last night, nine exchange cards were turned in.  Connie brought in Holly’s card.  Connie really wanted that little mermaid and was lucky enough to draw Holly’s name in the exchange.  Without more ado, here’s our “Life’s a Beach” exchange cards.  As always, click on the picture for details.

This first card is Jeannie’s purple vintage beach scene.  Jeannie said purple is her favorite color, this week.

Jeannie

Connie did this collage of beach motifs with some popped up shell embellishments.

Connie

Ella “strutted her stuff” with this popped up layered die cut seahorse.

Ella

Holly was off playing in Orlando this week, but had Connie bring in her exchange card with this fussy cut, popped up dreamy mermaid.

Holly

Therese made this card with the popped up frame around her colored flip flops.  Love the seashell border punch!

Therese

This is my palmy brayered silhouette sunset.  Russel didn’t like the brads!  Too bad!

Kathy

Lona made this torn and layered beach scene.  Love the little seabirds she cut out free hand and the puffy cotton ball cloud.

Lona

Rosie made this scallopy, glittery seahorse.  You can’t really tell, but there is frosty glitter all over it.

Rosie

Tange made this crabby sandcastle using the Perfect Pearl  technique Lona taught us last month.

Tange 

Tange did the project this month on how to use a brayer.  We did a nice background with versamark resist that we can use to make a card.  Lots of different brayers and colors made for lots of different results.  Very pretty, too.  Thanks, Tange!  I’m going to try to bring a finished card to show and tell next month.

For show and tell, Jeannie brought in a little blue wedding card she made using a “cherish” popped up embellishment. 

Jeannie's show and tell

That’s it for now. Comments always welcome.

(-: ¸.·´* .·´*¨¨)) -:¦:- ***
((¸¸.·´*~Kathy.·´*)****¨¨))
-:¦:- ·· ((¸¸.·´* .·´*((¸¸.·.·´ *-:¦:- ... :-)

Sunday, April 25, 2010

Connie’s Workshop

Connie hosted a workshop in her fabulous crop room (we’re working on getting her to do more cards!) and along with Connie, we had nine ladies.  We made the flower pot I previewed last time and a Mother’s Day/birthday card made with retiring colors.  The ladies didn’t object to me taking pictures, so here goes.  As always, click on the pic to see it in detail.

First, Connie’s table set up.  We had room for lots more, so we will probably be discussing having a shoebox swap at her house sometime this summer. 

Connie's set up

This next pic is half the ladies showing off their flower pots.  They all managed to look a little different with everyone’s details.

Happy ladies

Here’s the rest of the ladies with their pots.  That’s my hostess in the black top.

More happy ladies

I learned how to make this pot from Kerin Sylvester’s video tutorial:  here.  Her video is great. Love that Daisy flowers, 2, die that I used to make all the flowers.

This last pic is one of the samples I made using Garden from the Heart.  Colored the hat and gloves with markers and fussy cut them out.  Lovely Lilac, Orchid Opulence and Yo Yo Yellow are all retiring.  

Garden from Heart 4

That’s it for now. Comments always welcome.

(-: ¸.·´* .·´*¨¨)) -:¦:- ***
((¸¸.·´*~Kathy.·´*)****¨¨))
-:¦:- ·· ((¸¸.·´* .·´*((¸¸.·.·´ *-:¦:- ... :-)

Tuesday, April 13, 2010

April’s Stamp Club

Surprise!  I’m actually timely this month.  We had our meeting last night and while we had several absent members, we had ten ladies.  We decided what to do with our December Stamp Camp.  On our regular meeting on the second Monday of the month, we’re just going to have a pot luck Christmas party, exchange our Christmas cards, swap Christmas gift tags and have our Chinese gift exchange.  I’m thinking about a cookie exchange, too, maybe, for those who like that sort of thing.   The stamp camp will be some time in January, when we do projects that take longer than we can do at our monthly meetings.  So, start thinking about cool projects, ladies.

Our exchange theme this month was “My Favorite Color” and we had some great cards.  First up, my card with my favorite pink dogwood watercolored and fussy cut.  Click on any card for details.

Kathy's Pink Dogwood

Several ladies used purple as their favorite color.  First is Tange’s purple scalloped ovals on a dotted swiss background.

Tange's Purple Scallops

Helen’s get well card fooled us into thinking her favorite color was blue. 

Helen's Blue side

NOT!  Pink it is!

Helen's Pink Insides

Here’s another purple card, Holly’s Hi card with purple Primas.  Helen received this card in the exchange and was nice enough to scan and send me the pic since I forgot to take the pic after I wrote description on my cheat sheet! 

Holly's Purple Hi

Lona made this purty blue and silver dragonfly card.

Lona's Blue Dragonfly

Connie made this funky orange lamp card!  Something different from pink, blue and purple!

Connie's Orange Lamp

Jeannie submitted two purple cards, one finished and one not.  I call this one her “purple junk” card.  Look at the details and you’ll see the Chinese junk with its reflection.  This is a smaller than normal card.

Jeannie's Purple Junk

Since I got Jeannie’s name in the exchange, I chose the unfinished one and put it together this morning.  Lovely fussy cutting (my favorite) on the stylish lady.  Nothing embossed on this card, but you can still tell it’s Jeannie’s style.

Jeannie's Purple Lady 

Lona traded with Tange and did a great project using Perfect Pearl Powders.  I’d never used them before but it was a nifty technique.  Lona stamped the image on acetate with black Stazon and ran the acetate through her Xyron machine.  We peeled off the two layers, laid the image down sticky side up and brushed on the Perfect Pearl with detail brushes on the butterflies, clocks and coin.  Then we covered entire piece of acetate with Perfect Pearl (Lona and I used gold) before slipping the acetate powdered side down into the card front for which she had cut and punched the corners.  Here’s Lona’s sample with white background and mine with black.  The cards are really pretty and shimmery.  Thanks, Lona!

Lona's Perfect Pearls sample

Kathy's Perfect Pearls

That’s it for the cards.  Just because I can, here’s a picture I took this morning of the wisteria along the fence in my back yard.  I thought we had lost most of the wisteria in the cold snaps, but a couple days ago, it all just exploded!

Wisteria 2

Exciting news coming soon about Stampin’ Up’s color renovation.  Thirty colors are retiring, 10 retired in colors are returning, 5 totally new colors coming (for a total core of 40 instead of 48), 5 new in colors coming this year and 5 more next year.  Lots of specials to get everyone caught up, including customers, starting in July.  Markers, ink pads, crayons, pastels, all being updated.  If you kept your retired in colors from last year and have all the in colors from this year, there's only 5 totally new colors.  Soooo, it is not as bad as it looks, money wise.  It's the demos who got rid of last year's in colors that will be kicking themselves, even when there was a memo from SU to keep them.  Most are coming back, including Pacific Point and Riding Hood Red.  Let me know if you want to know what’s retiring so you can stock up on retiring cardstock and reinkers.

That’s it for now. Comments always welcome.

(-: ¸.·´* .·´*¨¨)) -:¦:- ***
((¸¸.·´*~Kathy.·´*)****¨¨))
-:¦:- ·· ((¸¸.·´* .·´*((¸¸.·.·´ *-:¦:- ... :-)

Sunday, March 21, 2010

Pam’s Workshop

Friday, Pam hosted a workshop for me and we had a rocking good time.  The ladies loved the things I demo’d and the two make and takes were very popular.  Here are pics of what we made or I demo’d, together with links to where to get more information. 

First, I showed the ladies how to make puffy flowers like this. 

Puffy flower

I got this idea from Corie off of her blog’s Feb. 5, 2010, post here.  These are very easy to make using 10 scalloped circles, clipped in a little bit, stacked on a brad and smooshed.

Then I showed how to assemble a cute little flowerpot.  I won’t post a link here because my next hostess wants to do them as a make and take for Mother’s Day at my next workshop.  Here’s a teaser pic.  Will blog the link after Connie’s workshop.  I gave this finished flower pot to my hostess.

Daisies Flowerpot

I showed these two lattice cards just as samples of what could be done with the lattice die.  The blue one was done with glue and glitters and the yellow one was done with markers.  Very stained glassy.

Lattice 2 Lattice 1

Then I got out these cute little bunnies as table decorations, eventually giving them away as door prizes.  They have chocolate treasures inside them.  I CASE’d the idea from Auntie Beaner off Splitcoastampers.  She had made little bunnies to cover the new style of mint patties.  Her bunnies are here.

 Punchy Bunnies

I thought the ladies would like to make a card with this cute little bunny and here is what I came up with.

Punchy Bunny

Last, but not least, the ladies all made this step card.  I got the idea from Julie Davison’s Sept. 18, 2009, post  here.

For All You Do 1

That’s it for now.  Comments always welcome.

(-: ¸.·´* .·´*¨¨)) -:¦:- ***
((¸¸.·´*~Kathy.·´*)****¨¨))
-:¦:- ·· ((¸¸.·´* .·´*((¸¸.·.·´ *-:¦:- ... :-)

Friday, March 12, 2010

March Creative Images Meeting

Wow, has it been a month already?  Time flies when you’re feeling poorly, I guess.  I couldn’t make it to the March meeting, but had lots of trusty help getting pictures taken for this blog.  I also managed to turn in my exchange card and challenge project. 

The exchange card theme this month was a “kid card” and the challenge projects were made out of cocktail napkins we’d picked out two months ago.   As always, click on any picture to see it in detail.  So here goes.

Connie’s kid card uses these bright crayons, a Cuttlebug embossing folder and a cute little “box” for the crayons.

 Connie's Crayon

Ella made this giant “h” out of what I think is the negative of a chipboard letter laid over some DSP.  Recycling!

Ella's H

I made another little Sweet Treat cup card with jelly bellies and the slide back so you can get them without destroying the card.  Matched the cardstock to the jelly bellies!

Kathy's Balloon

Gale made this card with a family of die cut bears popped up with up stuff.

Gale's Bears

Holly made this little watercolored (?) cutie and her cupcake, which I think is a brad. 
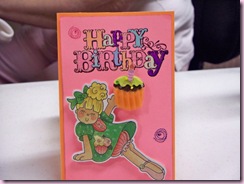
Holly's cupcake

This is Jeannie’s cute little giraffe, gold embossed and fussy cut.

Jeannie's giraffe 

This is Pam’s hoppy froggie.  Hey, Pam.  He needs googly eyes!

Pam's Frog

Lona made this cute little dress card with a template.

Lona's dress

Therese went for a slightly older kid card, but a chocoholic teenager is still a kid.  Love the rose brad in her hair!

Therese's Teen

Rosie used punches and SU’s Top Note die to make this cute little bunny card.

Rosie's Bunny

This is Tange’s bright card using a butterfly punch with some bling for its body.  I spy another Top Note!

Tange's Orange butterfly

Next up are the challenge napkin projects, starting with this mermaid Holly made.  She used dew drops for bubbles and added some tiny shells.  The mermaid’s tail looks like it might have aquarium gravel in it. 

Challenge Holly's

Jeannie showed her inspiration for her Easter card in purples and greens.   Lovely latticey look.
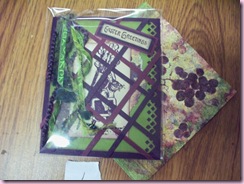
Challenge Jeannie's

This is my box made with five layers of cut out poinsettias.  I stiffened each layer with lots of Tacky glue that took forever, but eventually dried shiny clear and hard.

Challenge Kathy

Ursula made this hand mirror, using her rose napkin for the back of the mirror.

Challenge Ursula's

Linda made this wedding dress with her lacy white napkins.  Linda won our third prize for this gown.

Challenge Linda's

Lona used a wedding napkin for this shiny silver card which took second place.

Challenge Lona's

Therese won first place for this collage made with some grapey vinyard napkins. 

Challenge Therese's 

Here are our winners (Linda was out of town).  This pic shows the true size of Therese’s collage artwork.  Congratulations to our winners! 

Challenge Winners

Eleanor did the project this month using mini CD cases.  Here are two of her samples or two finished pieces.  They were colored with colored pencils.

Project 3

Ella used her Peace Within SU set for these two.

Project 2

Thanks for stopping by. Comments always welcome.

(-: ¸.·´* .·´*¨¨)) -:¦:- ***
((¸¸.·´*~Kathy.·´*)****¨¨))
-:¦:- ·· ((¸¸.·´* .·´*((¸¸.·.·´ *-:¦:- ... :-)